
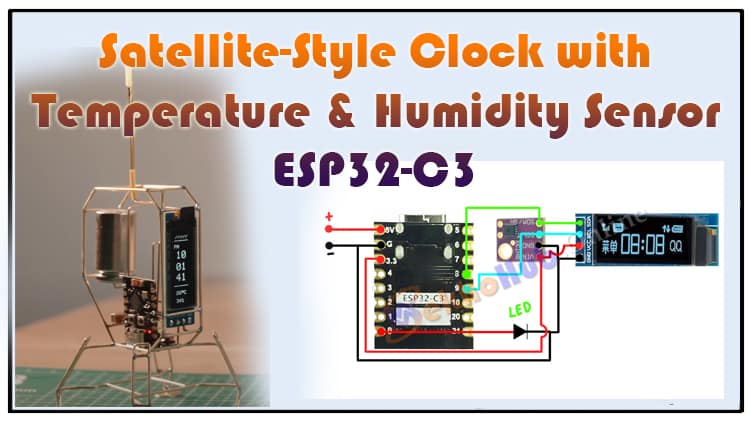
Build your own DIY mini satellite-style clock with temperature & humidity display using ESP32-C3. This DIY mini satellite-style clock project integrates an OLED display and SH31-D sensor for real-time monitoring. Powered by a 3.7V Li-ion battery with a charging and protection module, this DIY mini satellite-style clock is portable and efficient.
Learn to wire the OLED, SH31-D sensor, and LED with ESP32-C3 correctly. Follow the step-by-step guide to assemble the DIY mini satellite-style clock. The I2C bus simplifies connections for both OLED and SH31-D. Perfect for makers, this DIY mini satellite-style clock demonstrates microcontroller applications and sensor integration. Discover the full BOM, circuit diagram, and assembly instructions for your DIY mini satellite-style clock project.
Introduction
In the world of DIY electronics, combining portability, sensors, and microcontrollers can create fascinating projects that are both functional and visually appealing. This project demonstrates how to build a mini satellite-style clock powered by the ESP32-C3 development board, featuring real-time temperature and humidity monitoring. Inspired by Mohit Bhoite, this compact project integrates a 0.91-inch 128×32 OLED display and a SH31-D temperature and humidity sensor, all powered by a 3.7V Li-ion battery with a charging and protection module.
The design focuses on simplicity and efficiency: the ESP32-C3 handles all sensor readings, timekeeping, and display updates, while the I2C bus allows both the OLED and SH31-D sensor to communicate using only two data lines. This project is ideal for electronics enthusiasts who want a portable, functional, and visually appealing clock while learning about I2C communication, battery management, and microcontroller programming.
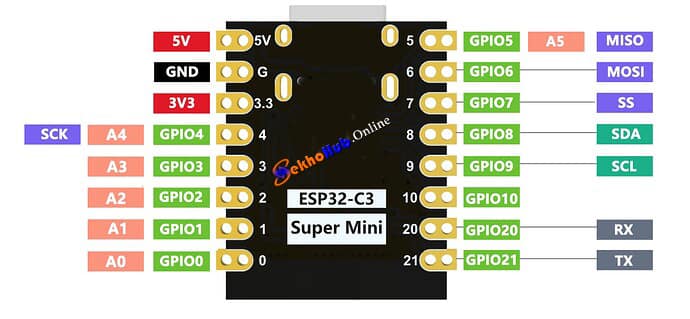
ESP32-C3 Pinout.
Materials for the Project
| S.No | Component | Quantity | Notes | Buy Link |
|---|---|---|---|---|
| 1 | ESP32-C3 Development Board | 1 | Main microcontroller | Buy |
| 2 | 0.91-inch 128×32 OLED Display | 1 | I2C interface | Buy |
| 3 | SH31-D Temperature & Humidity Sensor | 1 | I2C or digital output | Buy |
| 4 | 3.7V 40250 Li-ion Battery | 1 | Portable power | Buy |
| 5 | Battery Charging & Protection Module | 1 | Protects and charges battery | Buy |
| 6 | LED | 1 | Status indicator | Buy |
| 7 | Resistor 220Ω | 1 | For LED current limiting | Buy |
| 8 | Jumper Wires | 10+ | For connections | Buy |
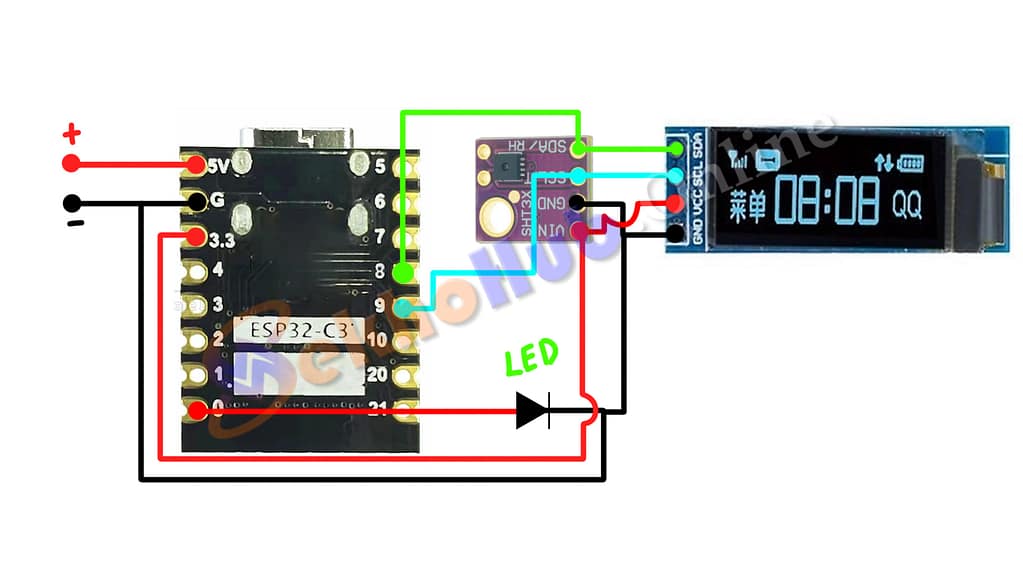
Circuit Diagram Explanation
Power Supply
+5V (Red) → ESP32-C3 5V pin
GND (Black) → ESP32-C3 G (Ground)
OLED Display (I2C)
GND → ESP32-C3 G
VCC → ESP32-C3 3.3V
SCL → GPIO8
SDA → GPIO9
SH31-D Sensor (I2C)
VIN (Red) → ESP32-C3 3.3V
GND (Black) → ESP32-C3 G
SCL (Green) → GPIO8 (shared with OLED)
SDA (Cyan) → GPIO9 (shared with OLED)
LED Indicator
Anode (+) → GPIO0 (with 220Ω resistor in series)
Cathode (–) → GND
Both OLED and SH31-D share the I2C bus. ESP32-C3 provides 3.3V to peripherals while running on 5V.
Download Circuit Diagram
Step-by-Step Assembly Guide
Prepare the ESP32-C3: Connect it to a 5V supply and verify it powers on.
Connect OLED Display: Attach GND, VCC, SCL, and SDA to ESP32-C3 according to the table above.
Connect SH31-D Sensor: Connect its VIN, GND, SCL, and SDA pins, sharing the I2C bus with OLED.
Connect LED Indicator: Use GPIO0 with a 220Ω resistor to GND.
Attach Battery: Connect the 3.7V Li-ion battery to the charging & protection module. Then, connect the module’s output to ESP32-C3 VIN and GND.
Test Power: Verify OLED and SH31-D sensor power up and display initial readings.
Upload Code: Write or upload firmware to ESP32-C3 to display time, temperature, and humidity on OLED.
Final Assembly: Place all components in a compact enclosure for a mini satellite-style look.
Note.


ESP32-C3 Code
Celsius (°C ) ver
Fahrenheit (°F) ver
Circuit Diagram Overview
ESP32-C3 at the center.
I2C bus shared between OLED and SH31-D (SCL → GPIO8, SDA → GPIO9).
LED connected to GPIO0 with current-limiting resistor.
Battery + protection module connected to VIN/GND.
FAQs
Q1: Can I power ESP32-C3 directly from the battery?
A1: Yes, but it’s recommended to use a battery protection & charging module to avoid over-discharge or short circuits.
Q2: Can I use another OLED size?
A2: Yes, as long as it supports I2C and is compatible with ESP32 voltage levels (3.3V).
Q3: Why share I2C bus between OLED and SH31-D?
A3: I2C allows multiple devices to communicate using the same clock (SCL) and data (SDA) lines, simplifying wiring.
Q4: Can I add Wi-Fi or BLE features?
A4: Absolutely! ESP32-C3 supports both Wi-Fi and BLE, so you can extend this clock to IoT applications.
Q5: What code library is needed?
A5: Use Adafruit_SSD1306 for OLED and Adafruit_BME280 for SH31-D sensor. Both support I2C communication.
Conclusion
The DIY mini satellite-style clock project is an excellent example of combining microcontroller programming, sensor integration, and portable electronics into a compact and functional device. By using the ESP32-C3 development board, a 0.91-inch OLED display, and the SH31-D temperature and humidity sensor, this project not only displays time but also provides real-time environmental monitoring.