

DIY Micro Filling Machine for Perfume, Serum, and Medicine Bottles
A micro filling machine is an excellent solution for precise liquid measurement in labs, small bottles, perfumes, serums, and medicine filling. This micro filling machine is accurate, compact, and easy to build with basic electronic components and 3D-printed parts. In this guide, I will explain how to make your own micro filling machine step by step.
Whether you need a micro filling machine for DIY projects, lab testing, or small-scale production, this project ensures consistency and accuracy. The micro filling machine operates between 1 ml and 10 ml ranges, saving time compared to manual filling. With a simple electronic circuit, potentiometers, tactile buttons, and motorized assembly, the micro filling machine becomes an essential DIY tool. This tutorial makes learning easy and practical. Build your own micro filling machine today with this detailed guide.
Introduction
Hello friends, welcome back to sekhohub.online.
In today’s project, I am going to show you how to build a DIY Micro Filling Machine. This machine is designed for precise liquid dispensing in the range of 1 ml to 10 ml. It’s a perfect solution for:
Small bottles
Lab use
DIY projects
Small-scale production
With this project, you can fill perfumes, serums, scents, medicines, or lab samples. It’s compact, accurate, and saves time compared to manual liquid filling.
This tutorial will guide you step by step — from component soldering to assembling 3D-printed parts and final testing.
Materials for the Project
| Component | Quantity | Description | Buy Link |
|---|---|---|---|
| Arduino Nano/Uno | 1 | Main controller board | Buy Here |
| NEMA 17 Stepper Motor | 1 | Drives syringe/pump | Buy Here |
| A4988 Stepper Driver | 1 | Controls NEMA motor | Buy Here |
| 12V DC Adapter (2A) | 1 | Power supply | Buy Here |
| Limit Switch | 1 | Home/reset position detection | Buy Here |
| Tactile Push Buttons | 2 | Start/Stop controls | Buy Here |
| 250kΩ Potentiometer (Optional) | 2 | For manual adjustment of speed/volume | Buy Here |
| 10kΩ Resistors | 3 | Pull-down resistors | Buy Here |
| 1kΩ Resistor | 1 | For LED current limiting | Buy Here |
| 100µF Capacitor | 1 | Power supply filtering | Buy Here |
| 5mm LED | 1 | Power/status indicator | Buy Here |
| DC Power Jack | 1 | External power input | Buy Here |
| PCB Board / Veroboard | 1 | For soldering components | Buy Here |
| Heat Sink for A4988 | 1 | Cooling the stepper driver | Buy Here |
| Syringe Pump or Peristaltic Pump | 1 | Actual liquid dispenser | Buy Here |
| Shaft Coupling | 1 | Connect motor to pump | Buy Here |
| Ball Bearing Holder | 1 | Smooth shaft support | Buy Here |
| 3D-Printed Parts Set | 1 | Tray, motor holder, brackets, pipe holder | Buy Here |
| Hardboard / Acrylic Sheet | 1 | Base frame (18×4 in) | Local Market |
| Jumper Wires & Connectors | Set | For Arduino connections | Buy Here |
Useful Tools
| Tool | Quantity | Purpose / Notes | Click & Buy |
|---|---|---|---|
| Soldering Iron Kit | 1 | For making permanent connections | Click & Buy |
| Solder Wire (60/40, 0.8mm) | 1 | Electrical soldering | Click & Buy |
| Wire Stripper & Cutter | 1 | Stripping jumper wires | Click & Buy |
| Mini Screwdriver Set | 1 | For module and relay terminal screws | Click & Buy |
| Multimeter | 1 | Testing voltages and continuity | Click & Buy |
| Hot Glue Gun (optional) | 1 | Securing components in place | Click & Buy |
| Small Pliers | 1 | Holding and bending wires | Click & Buy |
| Heat Shrink Tubing Set | 1 | Insulating exposed wires | Click & Buy |
Circuit Explanation
The circuit of this micro filling machine is simple but effective:
Power Supply: A 12V DC adapter is connected to the circuit. The 7805 regulator steps it down to 5V for logic components and LEDs.
Indicator LED: A 5mm LED with a 1kΩ resistor shows when the circuit is powered.
Control Section:
Two tactile buttons are used — one for Start and one for Stop.
10kΩ resistors are used as pull-down resistors to prevent false triggering.
Adjustment Section:
Two 250kΩ potentiometers allow fine adjustment of filling time and motor speed.
This helps achieve accurate 1ml–10ml filling control.
Actuator Section:
A NEMA stepper motor drives the pump via a shaft coupling.
A limit switch ensures the piston or syringe pump returns to the initial position after each fill.
Stability Components:
A 100µF capacitor ensures smooth motor operation and avoids sudden resets.
This simple yet reliable circuit ensures that the liquid filling process is consistent, repeatable, and accurate.
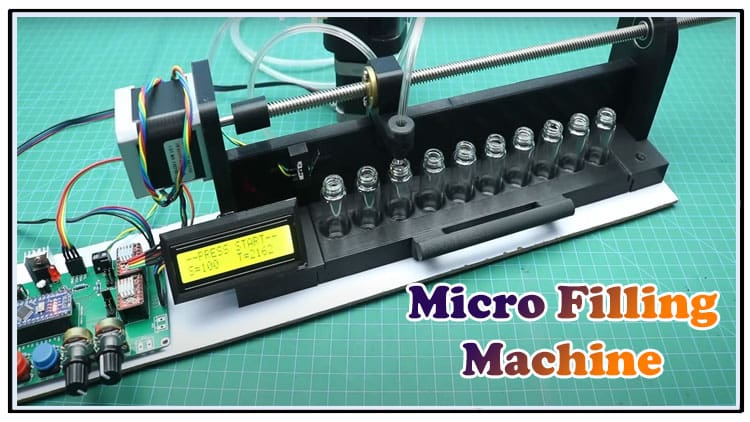
3D-Printed Mechanical Assembly

For the mechanical side, you’ll need several 3D-printed parts:
Bottle holding tray
Tray handle
Shaft coupling
Limit switch holder
Ball bearing holder
Stepper motor holder
Side brackets for the tray
Pipe holder
Back side frame (printed in two halves if printer size is small)
These parts are mounted on a hardboard base (18″ × 4″) using screws. Together, they form the frame and housing of the filling machine.
Step-by-Step Guide
Step 1: Soldering Components to PCB

Solder resistors, capacitors, potentiometers, buttons, and LED on your PCB.
Attach the DC jack and terminal block.
Fix the 7805 regulator with a heatsink for stable operation.
Step 2: Fixing the 3D-Printed Parts

Mount the back side frame on the hardboard.
Attach the stepper motor holder and insert the motor.
Fix the ball bearing holder to align the shaft.
Connect the tray brackets and place the bottle holding tray.
Install the pipe holder for the filling tube.
Step 3: Connecting the Limit Switch

Fix the limit switch holder near the tray.
Connect the switch wiring back to the PCB.
This ensures the system resets to zero position.
Step 4: Attaching the Stepper Motor
Connect the shaft coupling between the motor and the syringe pump.
Secure it firmly to prevent slipping.
Step 5: Final Assembly
Place the handle on the tray for smooth operation.
Connect the pump tubing to the outlet pipe holder.
Secure all wiring neatly with zip ties.
Step 6: Testing the Machine
Power up the circuit with a 12V adapter.
Adjust the potentiometers for desired fill amount (1–10ml).
Press the Start button — liquid should begin filling.
Use the Stop button for emergency stop or quick cutoff.
Verify the limit switch resets the pump to starting position.
Arduino Code
How This Code Works
AccelStepper Library: Used for smooth control of the NEMA stepper motor.
Start Button (Pin 4): Begins the filling process.
Stop Button (Pin 5): Immediately stops the filling cycle.
Limit Switch (Pin 6): Resets the motor to the zero position (home).
stepsPerMl Variable: You must calibrate how many motor steps equal 1 ml for your syringe pump.
targetVolume Variable: Defines how much liquid to fill (in ml). You can expand this with a potentiometer or keypad for adjustable volume.
Applications of Micro Filling Machine
Perfume & Serum Filling – small bottles for cosmetics.
Pharmaceutical Use – filling medicines in labs.
DIY Projects – hobby projects requiring liquid dispensing.
Food Industry – tiny flavor or essence bottles.
Laboratory Testing – accurate chemical or reagent dosing.
Advantages
Precise control (1ml–10ml range).
Compact and portable design.
Easy to assemble with off-the-shelf parts.
Saves time compared to manual filling.
Cost-effective for small-scale production.
FAQs
1. What is the range of filling capacity?
This DIY micro filling machine can fill 1 ml to 10 ml per cycle.
2. Can I use it for thick liquids?
Yes, but it is most suitable for low to medium viscosity liquids such as perfumes, serums, and medicines.
3. Do I need a microcontroller for this project?
No. This project works without Arduino. It uses simple electronic control circuitry.
4. Can I expand this for larger bottles?
Yes, by adjusting the motor speed and potentiometer settings, you can fill larger quantities.
5. Is 3D printing mandatory?
Not strictly. You can make the frame with wood, acrylic, or metal sheets, but 3D-printed parts make it easier.
Conclusion
Building a DIY Micro Filling Machine is a rewarding project for electronics and DIY enthusiasts. It combines electronics, mechanics, and fluid control into one compact design. With this setup, you can accurately dispense liquids in the range of 1 ml to 10 ml without relying on manual filling.
This machine is practical for labs, small businesses, DIY makers, and hobbyists who need precision and consistency. With just a few components and some 3D-printed parts, you can assemble your own reliable micro filling machine at home.