

How to Make an Automatic Light Control System
Automatic lighting systems are becoming common in homes, offices, and public spaces because they save energy and add convenience. Instead of manually switching lights on and off, these systems detect movement or distance and control the lighting automatically.
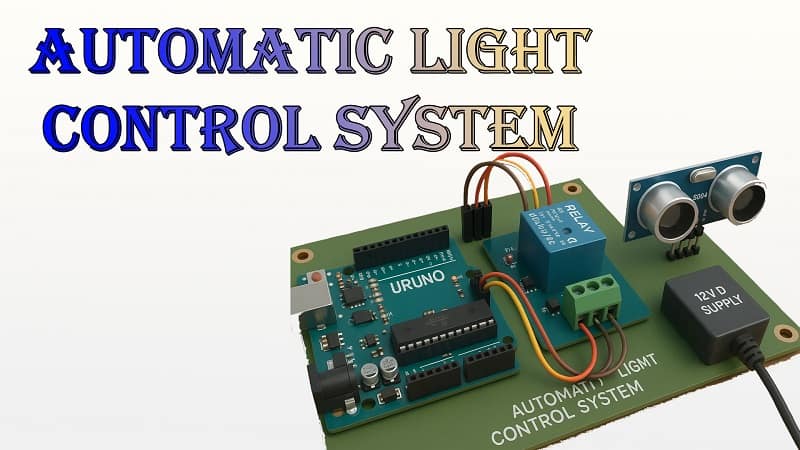
In this guide, we will build an automatic light control system using an Arduino Uno, an HC-SR04 ultrasonic sensor, and a relay module to control an AC lamp. The lamp will turn on when an object is detected within a certain range and turn off when no object is detected.
1. Introduction to the Project
The idea behind this project is simple:
- The HC-SR04 ultrasonic sensor measures the distance to any object in front of it.
- If the object is within a set distance, the Arduino Uno sends a signal to the relay module to turn on the light.
- When the object moves away, the Arduino turns the light off.
This type of system can be used in:
- Corridors and staircases
- Store rooms or garages
- Outdoor lighting for pathways
- Automatic lighting in commercial spaces
2. Components Required
For this project, you will need the following parts:
- 1x Arduino Uno board – The main microcontroller that processes sensor readings and
3. Materials for the Project (Automatic Light Control)
| S. No. | Component | Specification | Quantity | Description / Purpose |
| 1 | Arduino Uno | ATmega328P-based board | 1 | Main microcontroller for controlling the system |
| 2 | Relay Module | 1-Channel, 5V control, 10A | 1 | Switches the AC lamp on/off based on Arduino signal |
| 3 | HC-SR04 Ultrasonic Sensor | 2–400 cm range, 5V | 1 | Detects motion or presence for light control |
| 4 | 12V DC Power Supply | 12V DC Adapter, ≥1A | 1 | Provides power to relay and lamp circuit |
| 5 | AC Lamp | 100W, 220V/110V AC | 1 | Light source controlled by the relay |
| 6 | Jumper Wires | Male-to-Male & Male-to-Female | As required | For connecting Arduino, relay, and sensor |
| 7 | Breadboard (optional) | Medium size | 1 | For prototyping connections |
| 8 | Power Cable for Lamp | Rated for AC load | 1 | To connect lamp to relay and AC mains |
4. Circuit Diagram and Connections
Below is the step-by-step connection setup:
Ultrasonic Sensor (HC-SR04) to Arduino Uno:
- VCC → 5V on Arduino
- GND → GND on Arduino
- TRIG → Digital Pin 9
- ECHO → Digital Pin 10
Relay Module to Arduino Uno:
- VCC → 5V on Arduino
- GND → GND on Arduino
- IN → Digital Pin 8
Lamp and Relay Connections:
- Connect the AC lamp to the relay’s COM and NO terminals.
- Relay’s AC circuit will be powered separately from the Arduino’s DC supply for safety.
5. Safety Note
This project involves working with AC mains voltage. Always follow these precautions:
- Disconnect the power supply before wiring the relay to the AC lamp.
- Use insulated tools and avoid touching bare wires.
- If unsure about AC wiring, seek help from a qualified electrician.
6. Arduino Code for Automatic Light Control
Here’s a sample code for the system:
cpp
CopyEdit
#define trigPin 9
#define echoPin 10
#define relayPin 8
long duration;
int distance;
int threshold Distance = 50; // in centimeters
void setup() {
pinMode(trigPin, OUTPUT);
pinMode(echoPin, INPUT);
pinMode(relayPin, OUTPUT);
digitalWrite(relayPin, LOW); // Lamp off initially
Serial.begin(9600);
}
void loop() {
// Send ultrasonic pulse
digitalWrite(trigPin, LOW);
delayMicroseconds(2);
digitalWrite(trigPin, HIGH);
delayMicroseconds(10);
digitalWrite(trigPin, LOW);
// Read echo time
duration = pulseIn(echoPin, HIGH);
// Convert time to distance
distance = duration * 0.034 / 2;
Serial.print(“Distance: “);
Serial.print(distance);
Serial.println(” cm”);
// Control relay based on distance
if (distance > 0 && distance <= thresholdDistance) {
digitalWrite(relayPin, HIGH); // Lamp ON
} else {
digitalWrite(relayPin, LOW); // Lamp OFF
}
delay(200);
}
7. How the Code Works
- Pin Definitions: Assigns Arduino pins for the ultrasonic sensor and relay.
- Threshold Setting: Defines the maximum distance to trigger the lamp.
- Measurement Process: Sends a short pulse from the sensor and measures the return time.
- Distance Calculation: Uses the formula distance = (time × speed of sound) / 2.
- Relay Control: Turns the lamp on when distance is less than or equal to the threshold.
8. Testing the System
Once your circuit is connected and code uploaded:
- Power the Arduino via USB or external adapter.
- Place an object (like your hand) in front of the ultrasonic sensor.
- Move the object closer than the set threshold distance—the lamp should turn ON.
- Move the object away—the lamp should turn OFF.
9. Applications of This Project
- Energy-saving lighting in hallways and rooms.
- Security systems to detect movement and trigger lights.
- Automatic garden lights for pathways.
- Contactless switches in public places.
10. Advantages of the Ultrasonic-Based Light Control
- Contactless operation—no need to touch a switch.
- Customizable range—You can adjust the trigger distance in code.
- High sensitivity—Detects objects accurately in various lighting conditions.
- Energy efficiency—Reduces electricity usage by switching lights off automatically.
11. Improvements and Modifications
You can enhance this system in several ways:
- Add a light sensor (LDR) so the lamp only turns on in low-light conditions.
- Integrate with a timer to keep the lamp on for a set duration after detection.
- Use a PIR sensor for motion-based detection instead of distance measurement.
- Connect to a smart home system for remote control.
12. Conclusion
Building an automatic light control system with Arduino, an ultrasonic sensor, and a relay is a straightforward project that blends basic electronics with microcontroller programming. It’s practical, cost-effective, and can be expanded for more advanced automation setups.
By following the steps in this guide, you now have a working system that detects an object’s presence and automatically turns a lamp on or off. This is not only convenient but also an excellent way to save energy and extend the life of your lighting.
Key Points Recap:
- HC-SR04 measures distance accurately for object detection.
- Arduino Uno processes the measurement and controls the relay.
- The relay module safely switches the AC lamp.
- Adjustable threshold distance makes the system versatile.