

Learn how to build an IoT based plant watering system using ESP32 and capacitive soil moisture sensor. This IoT based plant watering system lets you monitor soil moisture remotely, automate plant irrigation, and control water pumps via Alexa and Synric Pro app. Build your own IoT based plant watering system step by step.
Introduction Plant Watering System
Maintaining healthy plants often requires regular watering, but it’s not always easy to remember or manage when you’re away. An IoT based plant watering system solves this issue by automatically monitoring the soil moisture and controlling a pump whenever needed. In this project, we will build a smart irrigation system using ESP32, a capacitive soil moisture sensor, and a relay module.
The system allows you to:
- View soil moisture readings on your smartphone from anywhere.
- Receive live updates using the Synric Pro IoT platform.
- Control your water pump with Amazon Alexa voice commands.
This article covers the complete setup including circuit diagram, source code, calibration, and step-by-step instructions.
Materials for the Project
| S.No | Component | Quantity | Buy Link |
|---|---|---|---|
| 1 | ESP32 Development Board | 1 | Buy ESP32 |
| 2 | Capacitive Soil Moisture Sensor | 1 | Buy Sensor |
| 3 | Relay Module (1 Channel) | 1 | Buy Relay |
| 4 | Water Pump (DC or AC) | 1 | Buy Pump |
| 5 | Jumper Wires (Male/Female) | As required | Buy Wires |
| 6 | Breadboard or PCB | 1 | Buy Breadboard |
| 7 | Power Supply (5V or 12V depending on pump) | 1 | BuySupply |
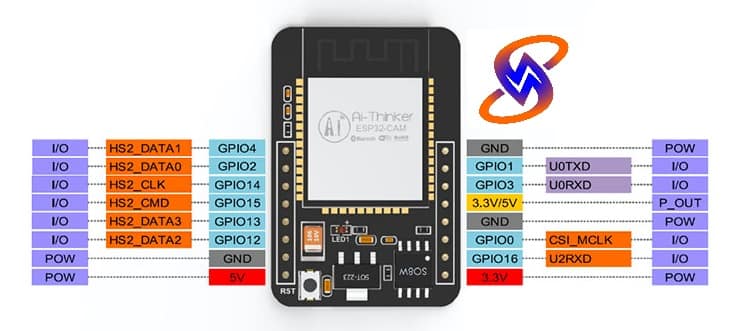
ESP32 Pinout.
Circuit Diagram Explanation
The circuit is straightforward and beginner-friendly:
- Capacitive Soil Moisture Sensor → Connected to ESP32 GPIO 34 (Analog input).
- Relay Module → IN pin connected to ESP32 GPIO 25.
- Pump → Wired through the relay’s NO (Normally Open) and COM terminal.
- ESP32 Power Supply → Powered via USB (5V). Pump power depends on type (5V/12V DC or AC).
When soil moisture goes below the threshold, the ESP32 sends data to Synric Pro, triggers a notification, and can automatically turn on the pump. Alexa integration allows voice commands like “Alexa, turn on garden pump”.
Download Circuit Diagram

Step-by-Step Guide
Step 1: Setting Up Hardware
- Connect ESP32, relay module, and soil sensor as per circuit.
- Ensure proper wiring between relay and pump for safe operation.
- Power supply should match pump voltage.
Step 2: Synric Pro Configuration
- Create an account on Synric Pro.
- Add two devices:
- Garden Pump (Switch type).
- Garden Soil Moisture Sensor (Custom template).
- Configure device template:
- Range (0–100% for moisture).
- Mode (Wet/Dry soil).
- Push notification enabled.
Step 3: Calibrating the Soil Sensor
- Upload a test code to ESP32 to get raw analog values.
- Record readings for:
- Dry soil
- Wet soil
- Intermediate moisture
- Update these values in the main code for accurate percentage conversion.
Step 4: Uploading the Main Code
- Install required libraries (Synric Pro, WiFi, ArduinoJson, etc.).
- Enter Wi-Fi credentials, Synric Pro keys, and device IDs.
- Upload the sketch to ESP32 using Arduino IDE.
Step 5: Testing the System
- Open Serial Monitor to check live readings.
- Dip sensor in soil or water to see % moisture update.
- Control the pump using Synric Pro mobile app.
- Enable Alexa skill “Synric Pro” in Amazon Alexa app and link account.
- Test commands:
- Alexa, turn on garden pump.
- Alexa, turn off garden pump.
Download ESP32-C3 Code
Applications
- Smart home gardening.
- Automatic irrigation for farms.
- Greenhouse plant monitoring.
- Remote agriculture monitoring via IoT.
FAQs
Q1: Why use a capacitive soil moisture sensor instead of resistive?
Capacitive sensors are more durable and resistant to corrosion compared to resistive ones.
Q2: Can I run the system without Alexa?
Yes, you can fully operate it using the Synric Pro app on your phone.
Q3: Can I use multiple soil sensors with one ESP32?
Yes, ESP32 has multiple GPIO pins, so you can add multiple sensors to monitor different plants.
Q4: What pump should I use?
A small DC pump (5V or 12V) is ideal for pots. For larger setups, use a solenoid valve or AC water pump with proper relay.
Q5: Can I automate the pump?
Yes, you can set conditions in the code so the pump automatically turns on when soil moisture drops below a threshold.
Conclusion
This project shows how easy it is to build an IoT based plant watering system with ESP32. By combining soil moisture sensing with IoT platforms like Synric Pro and Alexa, you can monitor your plants from anywhere and even water them with a voice command. It’s an excellent DIY project for smart gardening and automation enthusiasts.