
This guide explains how to make a solar powered water level sensor using an ESP32-C3, ultrasonic sensor, and Home Assistant. A solar powered water level sensor is perfect for monitoring water tanks remotely. Learn how to build a solar powered water level sensor with rechargeable battery, TP4056 charger, and a 3D-printed enclosure.
The solar powered water level sensor connects to Wi-Fi and sends readings directly to your dashboard. Using deep sleep mode, the solar powered water level sensor saves power and lasts longer. A solar powered water level sensor is ideal for outdoor use. With simple wiring, the solar powered water level sensor is reliable and efficient. Build your own solar powered water level sensor today with our full step-by-step guide.
Introduction
Monitoring water tank levels can be a daily hassle. Climbing ladders, lifting lids, and peeking into dark tanks is not only inconvenient but also unsafe. A solar powered water level sensor offers a smarter, safer, and more efficient solution. In this project, we’ll build one using an ESP32-C3, an ultrasonic sensor, and a small solar panel. The system is Wi-Fi enabled, integrates seamlessly with Home Assistant, and runs completely off-grid.
Materials for the Project
| Component | Description | Buy Link |
|---|---|---|
| ESP32-C3 Super Mini | Microcontroller with Wi-Fi, supports deep sleep | Buy Here |
| AJ-SR04M Ultrasonic Sensor | Waterproof distance sensor | Buy Here |
| TP4056 Module (with Protection) | Lithium battery charging circuit | Buy Here |
| 18650 Li-ion Battery (3.7V) | Rechargeable power source | Buy Here |
| 5V Boost Converter | Steps 3.7V battery to 5V | Buy Here |
| 470µF Capacitor | Voltage smoothing | Buy Here |
| 6V 1W Solar Panel | Charges the battery | Buy Here |
| 1K + 2K Resistors | Voltage divider for echo pin | Buy Here |
| Perfboard | For mounting and wiring | Buy Here |
| 3D-Printed Enclosure | Custom weather-resistant case | Buy Here |
Useful Tools
| Tool | Quantity | Purpose / Notes | Click & Buy |
|---|---|---|---|
| Soldering Iron Kit | 1 | For making permanent connections | Click & Buy |
| Solder Wire (60/40, 0.8mm) | 1 | Electrical soldering | Click & Buy |
| Wire Stripper & Cutter | 1 | Stripping jumper wires | Click & Buy |
| Mini Screwdriver Set | 1 | For module and relay terminal screws | Click & Buy |
| Multimeter | 1 | Testing voltages and continuity | Click & Buy |
| Hot Glue Gun (optional) | 1 | Securing components in place | Click & Buy |
| Small Pliers | 1 | Holding and bending wires | Click & Buy |
| Heat Shrink Tubing Set | 1 | Insulating exposed wires | Click & Buy |
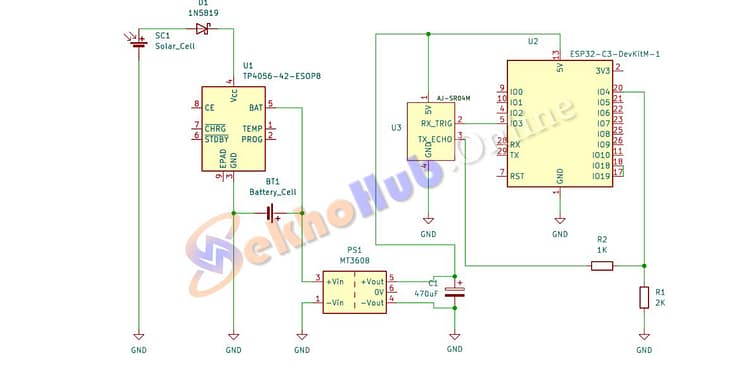
Circuit Diagram Explanation
The heart of this project is the ESP32-C3, which communicates with the AJ-SR04M ultrasonic sensor.
- Ultrasonic Sensor: Measures distance from the tank lid to the water surface.
- Boost Converter: Steps up 3.7V battery to 5V for ESP32 and sensor.
- TP4056 Module: Manages charging from solar panel to battery.
- Capacitor: Stabilizes sudden current spikes when ESP boots.
- Voltage Divider (1K+2K Resistors): Ensures safe logic level conversion from 5V sensor output to 3.3V ESP input.
Download Circuit Diagram
ESP32-Water-Level-Sensor Automations.yml
ESP32-Water-Level-Sensor configuration.yml
ESP32-Water-Level-Sensor watertank-level.yml
Step-by-Step Build Guide
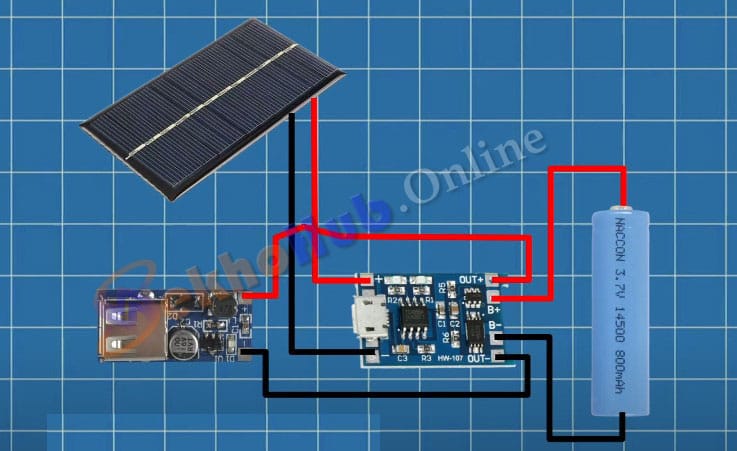
Step 1: Assemble the Power System
- Connect the solar panel to TP4056 input.
- Connect 18650 battery to TP4056 output.
- From TP4056 output, route power into 5V boost converter.
- Place capacitor across boost output for stability.
Step 2: Connect the ESP32-C3
- ESP32 powered via boost converter 5V line.
- Trigger pin of ultrasonic → GPIO4.
- Echo pin of ultrasonic → Voltage divider → GPIO3.
- Ground connections common across all modules.
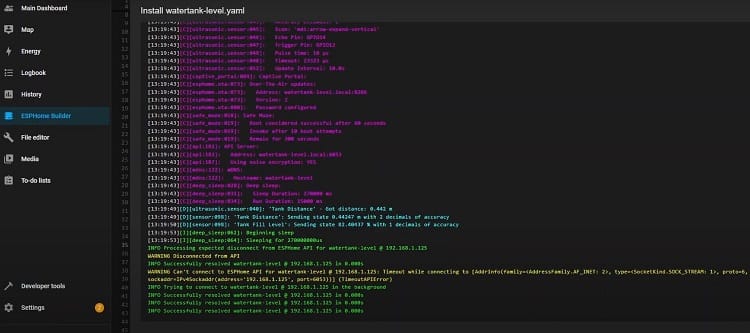
Step 3: Configure ESPHome Firmware
- Install ESPHome on your system.
- Flash ESP32-C3 with YAML config.
- Add ultrasonic sensor code block.
- Enable deep sleep (60 minutes normal / 5 minutes retry on failure).
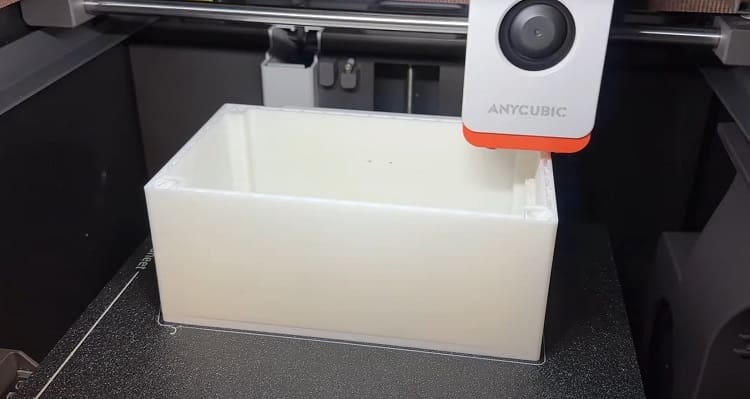
Step 4: Design & Print Enclosure
- Design enclosure in FreeCAD or Fusion 360.
- Leave space for solar panel mount and sensor opening.
- Print in PETG or ASA for durability.
- Add brass inserts for screws.
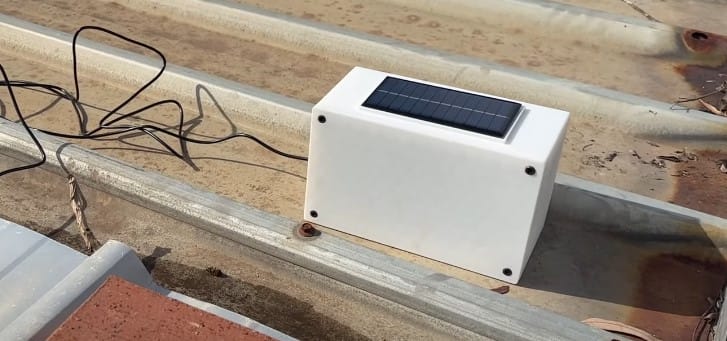
Step 5: Mount & Seal Components
- Install PCB inside enclosure.
- Mount solar panel on top, seal edges with silicone.
- Mount ultrasonic sensor facing tank water surface.
- Ensure waterproof cable entry.
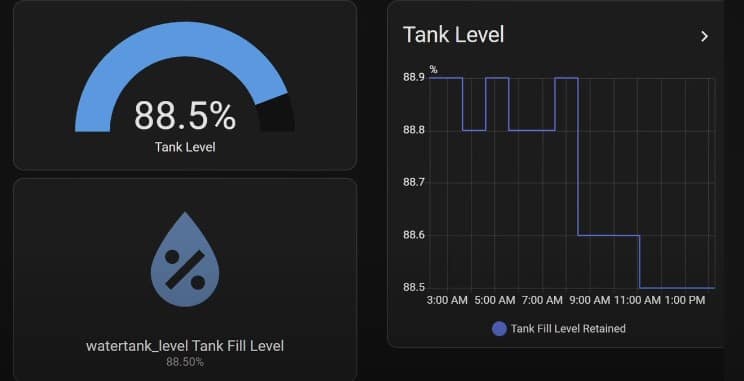
Working Principle
When powered up, the ESP32-C3 connects to Wi-Fi and Home Assistant. It takes a distance reading, sends data, and goes into deep sleep. On failure, it retries after 5 minutes. This ensures long battery life.
Advantages of This Build
- Completely Off-Grid – runs on solar and rechargeable battery.
- Wi-Fi Connected – integrates with Home Assistant.
- Low Power – deep sleep extends battery life.
- Accurate Measurement – ultrasonic sensor provides reliable readings.
- Customizable – add battery monitoring, automations, or irrigation control.
FAQs
Q1: Can I use a regular HC-SR04 instead of AJ-SR04M?
Not recommended for outdoor tanks since it isn’t waterproof.
Q2: How long does the system run without sunlight?
With deep sleep, a single 18650 can last several days without recharge.
Q3: Do I need Home Assistant?
No, you can use MQTT, Blynk, or other IoT dashboards if you prefer.
Q4: Can I monitor battery voltage?
Yes, by adding a voltage divider from the battery to an ESP32 ADC pin.
Q5: Is PLA 3D print good for outdoor use?
PLA works for testing but will degrade under sunlight. PETG or ASA is better.
Conclusion
This project demonstrates a reliable way to monitor tank levels without manual effort. With an ESP32-C3, solar power, and ESPHome integration, you get a solar powered water level sensor that is efficient, customizable, and easy to maintain. Whether you use it for farm irrigation, rainwater harvesting, or household tanks, this setup can save you time and effort.