
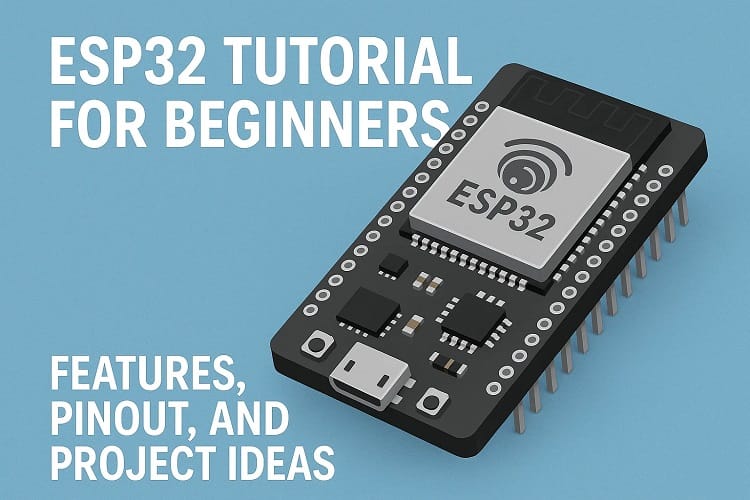

1.Introduction to ESP32
What is ESP32?
The ESP32 is a low-cost, low-power, and highly versatile microcontroller developed by Espressif Systems. It is the successor to the popular ESP8266 and is widely used in IoT (Internet of Things) applications, DIY electronics, and embedded systems.
Key features include:
Dual-core Tensilica LX6 microprocessor (up to 240 MHz)
Built-in Wi-Fi and Bluetooth (classic + BLE) connectivity
Multiple GPIOs for digital and analog functions
ADC, DAC, SPI, I2C, UART, CAN, PWM support
Onboard touch sensors and hardware encryption support
In short, the ESP32 is not just a microcontroller—it’s a complete system-on-chip (SoC) that combines connectivity, speed, and flexibility in one tiny package.
History and Evolution (ESP8266 vs ESP32)

Before ESP32, hobbyists and engineers relied on the ESP8266, another microcontroller by Espressif that revolutionized DIY IoT projects due to its affordability and built-in Wi-Fi.
ESP8266 (2014):
Single-core microcontroller (80–160 MHz)
Limited GPIOs
Only Wi-Fi support
Became popular due to low cost (~$2–$5)
ESP32 (2016 onwards):
Dual-core processor, faster clock speeds
More GPIOs with flexible functions
Wi-Fi and Bluetooth support
Lower power modes for battery-based projects
Expanded memory and hardware peripherals
This transition allowed developers to go beyond simple Wi-Fi devices (like smart plugs or LED controllers) and create complex IoT systems, such as wearable devices, home automation hubs, and industrial sensors.
Why ESP32 Became Popular in IoT and DIY Electronics
There are several reasons why the ESP32 quickly gained popularity among engineers, students, and makers:
Connectivity in One Chip – Wi-Fi and Bluetooth together eliminate the need for extra modules.
Affordable Price – Despite advanced features, ESP32 modules are available at very low cost (~$4–$10).
Low Power Consumption – Ideal for battery-powered IoT devices with deep sleep modes.
Huge Community Support – Open-source libraries, Arduino IDE support, and countless tutorials.
Flexibility – It can act as a microcontroller, IoT node, web server, or even a standalone computer with display and sensors.
Scalability – Works for simple DIY projects (smart LEDs, weather stations) up to professional solutions (industrial monitoring, wearable devices).
2.Features of ESP32
The ESP32 is packed with features that make it one of the most powerful and versatile microcontrollers available for IoT and DIY electronics. Below are its most important highlights:
1. Dual-Core Processor
The ESP32 is powered by dual-core Tensilica LX6 CPUs, running at up to 240 MHz.
It can handle multitasking efficiently — for example, one core can manage Wi-Fi communication while the other executes application logic.
This ensures smooth performance even in complex projects like web servers, real-time sensor monitoring, or audio streaming.
Compared to single-core microcontrollers, the dual-core architecture provides faster processing and higher reliability in data-heavy applications.
2. Wi-Fi and Bluetooth (BLE)
One of the key reasons for ESP32’s popularity is its built-in wireless connectivity:
Wi-Fi (802.11 b/g/n):
Connects to home/office networks or acts as an Access Point.
Enables direct communication with smartphones, PCs, or cloud services.
Bluetooth:
Supports Classic Bluetooth for legacy devices.
Supports Bluetooth Low Energy (BLE) for low-power wearable and sensor applications.
This dual wireless capability makes ESP32 ideal for IoT devices, smart home automation, and portable gadgets.
3. GPIO Pins and Peripherals
The ESP32 offers a wide range of GPIO (General Purpose Input/Output) pins and built-in peripherals:
Analog:
18 × 12-bit ADC channels
2 × 8-bit DAC outputs
Digital:
PWM outputs for motor/LED control
UART, SPI, I²C, I²S, CAN bus support
Special Functions:
Touch sensors for capacitive input (used in touch buttons/sliders)
Hall effect sensor (detects magnetic fields)
SD card interface support
With so many peripherals, the ESP32 reduces the need for external ICs in most projects.
4. Power Efficiency (Deep Sleep Modes)
For IoT and portable projects, low power consumption is critical. ESP32 includes multiple sleep modes:
Modem Sleep: Wi-Fi & Bluetooth off, CPU active.
Light Sleep: CPU paused, memory retained, wake-up via GPIO or timer.
Deep Sleep: Most of the chip powered down, current consumption drops to 10 µA or less.
This makes ESP32 perfect for battery-powered devices, such as sensors that wake up periodically to send data.
5. Memory and Storage
The ESP32 provides plenty of memory for program execution and data storage:
RAM: 520 KB (SRAM)
ROM: 448 KB (for bootloader and core functions)
External Flash: Usually 4 MB (expandable up to 16 MB on some boards)
EEPROM (via emulation): For storing small configuration data
3.ESP32 Variants and Development Boards

Since its launch, Espressif Systems has released multiple versions of the ESP32 to serve different applications. Each variant has slightly different specifications, optimized for either performance, wireless connectivity, or low-power consumption.
1. ESP32 SoC Variants
ESP32-WROOM
The most common and widely used ESP32 module.
Comes with 4 MB external flash memory.
Supports both Wi-Fi and Bluetooth (classic + BLE).
Used in most ESP32 DevKit boards.
Applications: IoT devices, hobby projects, automation, web servers.
ESP32-WROVER
Enhanced version of the WROOM module.
Includes PSRAM (4 MB or 8 MB) in addition to flash.
Better suited for applications requiring image processing, audio, or graphics.
Applications: Cameras, AI projects, advanced data logging.
ESP32-S2
Single-core processor (no dual-core like classic ESP32).
Focused on low-power IoT applications.
Only supports Wi-Fi, no Bluetooth.
Applications: USB devices, low-cost IoT gadgets, security tokens.
ESP32-C3
Based on RISC-V architecture instead of Tensilica cores.
Has Wi-Fi + BLE 5.0 support.
More energy-efficient and secure, supports IoT security standards.
Applications: Secure IoT devices, smart locks, sensors.
ESP32-S3
Latest powerful version with dual-core + vector instructions for AI/ML.
Supports Wi-Fi + Bluetooth 5.0.
Includes optional PSRAM like WROVER.
Designed for AI on the edge, facial recognition, and speech detection.
Applications: AIoT, wearables, voice assistants.
2. Popular Development Boards
NodeMCU ESP32
A development board version of ESP32 with USB-to-Serial (CH340/CP2102).
Comes with built-in pins for easy prototyping.
Compatible with Arduino IDE and MicroPython.
Ideal for DIY beginners and quick IoT prototypes.
ESP32 DevKit v1
Official Espressif development board based on ESP32-WROOM module.
Has 30 or 38 GPIO pins exposed.
Features onboard voltage regulator and USB interface.
Reliable and widely used for IoT and robotics projects.
3. Differences and Applications
| Variant / Board | CPU | Connectivity | Extra Features | Applications |
|---|---|---|---|---|
| ESP32-WROOM | Dual-core | Wi-Fi + BT | Standard 4MB Flash | IoT basics, automation |
| ESP32-WROVER | Dual-core | Wi-Fi + BT | Extra PSRAM | Camera, AI, graphics |
| ESP32-S2 | Single-core | Wi-Fi only | USB OTG | Low-power IoT |
| ESP32-C3 | RISC-V single-core | Wi-Fi + BLE 5.0 | Secure IoT features | Smart locks, sensors |
| ESP32-S3 | Dual-core + AI accel. | Wi-Fi + BLE 5.0 | AI/ML support, PSRAM | AIoT, voice assistants |
| NodeMCU ESP32 | Dual-core | Wi-Fi + BT | Beginner-friendly board | Learning, prototyping |
| ESP32 DevKit v1 | Dual-core | Wi-Fi + BT | 30–38 GPIO pins | Robotics, IoT projects |
4.ESP32 Pinout and Technical Specifications
The ESP32 microcontroller comes with a rich set of pins and peripherals, making it extremely versatile for both beginners and professional engineers. Understanding its pinout is essential before starting any project.
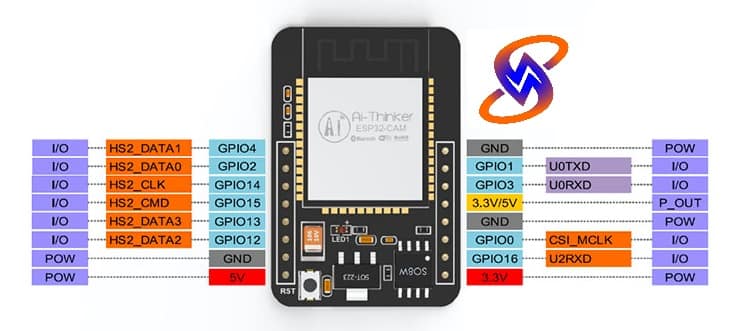
1. Explanation of GPIO Pins
Total GPIOs: ESP32 typically has 36 pins, but depending on the development board, around 25–30 GPIOs are exposed.
Multi-function Pins: Each GPIO can serve multiple purposes (digital I/O, analog input, PWM, communication protocols).
Voltage Levels: All GPIOs operate at 3.3V logic. Applying 5V directly can damage the chip.
Input/Output:
Maximum output current: ~40 mA
Recommended safe range: 12–20 mA
Some pins are reserved for boot mode (like GPIO0, GPIO2, GPIO15), so they must be used carefully.
2. Analog and Digital Pins
Digital I/O
Almost all GPIOs can function as digital input/output.
Used for switches, LEDs, relays, etc.
Analog Input (ADC)
18 channels of 12-bit ADC.
Resolution: 0–4095 steps (12-bit).
Input voltage range: 0–3.3V.
Applications: Sensors like temperature, light, potentiometers.
Analog Output (DAC)
2 DAC channels (GPIO25 & GPIO26).
Resolution: 8-bit.
Can generate true analog voltages (not PWM).
Applications: Audio output, analog control signals.
3. PWM, I²C, SPI, UART
PWM (Pulse Width Modulation)
Available on all digital pins.
Frequency: up to 40 MHz (configurable).
Applications: Motor speed control, LED dimming, audio signals.
I²C (Inter-Integrated Circuit)
2 I²C interfaces (SDA, SCL pins can be assigned to almost any GPIO).
Applications: LCDs, EEPROMs, sensors (e.g., MPU6050, BMP280).
SPI (Serial Peripheral Interface)
4 SPI interfaces available.
High-speed communication with displays, memory cards, and sensors.
Applications: OLED/TFT displays, SD cards, flash memory.
UART (Universal Asynchronous Receiver/Transmitter)
3 UART interfaces (UART0, UART1, UART2).
Used for communication with GPS, GSM modules, debugging via Serial Monitor.
4. ADC & DAC Capabilities
ADC (Analog-to-Digital Converter)
12-bit resolution (0–4095).
Configurable attenuation for extended input ranges:
0–1.1V
0–2.5V
0–3.3V
Applications: Read analog sensors with high precision.
DAC (Digital-to-Analog Converter)
2 channels: GPIO25, GPIO26.
8-bit resolution (0–255).
Generates smooth analog voltages (not simulated like PWM).
Applications: Audio wave generation, analog control outputs.
5.Getting Started with ESP32
If you’re new to the ESP32, this section will guide you through the basics of setting up your development environment, connecting hardware, and uploading your very first program.
1. Required Hardware
To begin working with ESP32, you only need a few basic items:
ESP32 Development Board (ESP32 DevKit v1 or NodeMCU ESP32)
USB Cable (Micro-USB or USB-C) depending on your board
Computer (Windows, macOS, or Linux) with internet access
Breadboard & Jumper Wires (optional, for connecting external components)
LED & Resistor (220Ω – 330Ω) for the first “Blink” program test
Most ESP32 boards already come with a built-in onboard LED (usually connected to GPIO2), so you can even run your first test without external components.
2. Installing Arduino IDE / PlatformIO
Option 1: Arduino IDE
Download and install the Arduino IDE from Arduino’s official website.
Open Arduino IDE → Go to File > Preferences.
In the Additional Board Manager URLs field, add the following link:
Click OK and then go to Tools > Board > Boards Manager.
Search for ESP32 and install the package by Espressif Systems.
Option 2: PlatformIO (VS Code Extension)
Install Visual Studio Code.
Add the PlatformIO IDE extension from the marketplace.
Open PlatformIO → Create New Project → Select ESP32 Dev Board.
PlatformIO automatically downloads the ESP32 support files.
Arduino IDE is recommended for beginners, while PlatformIO is better for advanced users working on large projects.
3. Adding ESP32 Board Support
Once installed, select your board in Arduino IDE:
Go to Tools > Board > ESP32 Arduino.
Choose ESP32 Dev Module (or NodeMCU ESP32 depending on your hardware).
Set the correct Port under Tools > Port (your ESP32 should be listed once connected via USB).
4. First Program (Blink LED)
Here’s the simplest program to test your ESP32:
Uploading the Code
Connect ESP32 to your computer via USB.
Select the correct Board and Port.
Click the Upload (→) button.
Wait for the code to compile and upload.
The onboard LED (or external LED on GPIO2) should start blinking.
6.ESP32 Programming & Libraries
The ESP32 supports multiple development frameworks and libraries, giving developers the freedom to choose between beginner-friendly environments and professional SDKs.
1. Using Arduino IDE
The Arduino IDE is the most popular choice for beginners and hobbyists working with ESP32.
Advantages:
Simple interface and easy setup.
Huge collection of open-source libraries.
Large community support.
How it works:
Install the ESP32 Board Package from Board Manager.
Write code in standard Arduino syntax (C/C++).
Upload directly via USB.
Example: Using Wi-Fi library to connect ESP32 to a Wi-Fi network only requires a few lines of code.
2. ESP-IDF (Official SDK) Introduction
For professional projects, Espressif provides ESP-IDF (Espressif IoT Development Framework).
Written in C and C++ with full hardware access.
Provides advanced control over Wi-Fi, Bluetooth, power modes, and security features.
Includes debugging tools, FreeRTOS support, and OTA (Over-the-Air) updates.
Works with VS Code, Eclipse, and command-line tools.
ESP-IDF is more complex than Arduino IDE but is preferred for commercial IoT products where stability, efficiency, and security are critical.
3. Popular ESP32 Libraries
The ESP32 ecosystem has a wide range of ready-to-use libraries for common applications:
WiFi.h → Connects ESP32 to Wi-Fi networks.
HTTPClient.h → Sends HTTP GET/POST requests to web servers.
PubSubClient.h (MQTT) → Connects ESP32 to cloud IoT platforms like HiveMQ, Adafruit IO, AWS IoT.
Wire.h (I²C) → Communicates with sensors and modules like BMP280, OLED displays.
SPI.h → Interfaces with displays, SD cards, and high-speed peripherals.
BluetoothSerial.h → Enables Bluetooth classic communication.
BLEDevice.h → For Bluetooth Low Energy (BLE) applications such as wearables.
FS.h / SD.h → File handling on microSD cards or SPIFFS storage.
AsyncWebServer.h → Runs a web server directly on ESP32 for control via browser.
7.Applications of ESP32
The ESP32 is widely used across IoT, robotics, wearable devices, and industrial systems because of its powerful features and affordability. Below are the most common applications:
1. IoT Projects (Smart Home, Automation, Sensors)
Smart Home Automation:
ESP32 can control lights, fans, and appliances using Wi-Fi and smartphone apps.
Works with platforms like Home Assistant and OpenHAB.
Smart Sensors:
Integrates with sensors like DHT22 (temperature & humidity), PIR motion, and LDR (light detection).
Sends data wirelessly to mobile apps or dashboards.
Security Systems:
Can power DIY CCTV cameras (ESP32-CAM), smart locks, and alarm systems.
Example: An ESP32 can control a relay module for turning appliances on/off through a web interface.
2. Data Logging and Cloud Communication
ESP32 is widely used in data acquisition and cloud-based IoT projects:
ThingSpeak:
Logs sensor data (temperature, pressure, humidity) and displays it in graphs.
Blynk:
Mobile app platform for IoT projects with customizable dashboards.
Google Firebase / AWS IoT / MQTT:
Enables real-time communication between devices and cloud servers.
SD Card Logging:
Stores sensor readings locally for offline analysis.
Example: A weather station using ESP32 + BMP280 sensor can upload real-time climate data to ThingSpeak for monitoring.
3. Robotics and Control Systems
The high-speed processing and PWM capabilities make ESP32 suitable for robotics:
Motor Control:
Drives DC, stepper, and servo motors using motor driver ICs.
Wireless Robots:
ESP32 can be programmed as a Wi-Fi hotspot to control robots from a smartphone.
IoT-enabled Robots:
Robots that upload telemetry data to cloud platforms.
Example: An ESP32-controlled robot car can be steered using a Bluetooth smartphone app or a Wi-Fi web server.
4. Wearables and Portable Devices
Because of its low-power modes and Bluetooth connectivity, ESP32 is ideal for wearables and battery-powered gadgets:
Smart Watches / Fitness Trackers:
ESP32-S3 can handle step counting, heart rate monitoring, and Bluetooth syncing.
Portable Health Devices:
ESP32 + BLE sensors can transmit patient data to mobile apps.
ESP32 Audio Projects:
Supports MP3 streaming, voice assistants, and Bluetooth speakers.
Advantages & Limitations of ESP32
Like any microcontroller, the ESP32 has its strengths and weaknesses. Knowing both sides helps developers make informed decisions when designing projects.
8. Advantages of ESP32
Low Cost
Despite powerful features, ESP32 boards are very affordable (typically $4–$10).
Powerful Performance
Dual-core processor up to 240 MHz.
Large memory (520 KB SRAM, external flash up to 16 MB).
Handles multitasking smoothly (e.g., Wi-Fi + data processing).
Wireless Connectivity Built-In
Wi-Fi + Bluetooth (Classic + BLE) on a single chip.
No need for external modules.
Versatile GPIOs & Peripherals
18 ADC channels, 2 DACs, touch sensors, SPI, I²C, UART, PWM.
Ideal for connecting a wide range of sensors and actuators.
Low-Power Modes
Deep sleep draws as little as 10 µA, making it suitable for portable IoT.
Strong Community & Ecosystem
Extensive tutorials, open-source libraries, and support in Arduino IDE, ESP-IDF, and MicroPython.
Compatible with major IoT platforms (ThingSpeak, Firebase, Blynk, AWS IoT).
❌ Limitations of ESP32
Somewhat Complex for Beginners
More features mean a steeper learning curve compared to simpler boards like Arduino Uno.
Pin multiplexing can be confusing (one GPIO often has multiple functions).
Power Consumption (Active Mode)
While efficient in deep sleep, ESP32 consumes 80–260 mA when Wi-Fi is active.
For always-on battery projects, this can be a challenge.
Limited 5V Tolerance
ESP32 GPIOs only support 3.3V logic.
Interfacing with 5V sensors often requires level shifters.
Not Real-Time Focused
Runs on FreeRTOS, but not as deterministic as dedicated real-time MCUs (e.g., STM32).
May struggle with hard real-time industrial applications.
ESP32 Project Ideas (Beginner to Advanced)
The ESP32 is not only powerful but also versatile, making it a perfect choice for projects of all skill levels. Below are some beginner-to-advanced project ideas to get started:
Beginner-Level Projects
1. ESP32 Web Server
Create a basic web server on the ESP32 that can be accessed via any browser.
Control onboard or external LEDs, read button states, or display sensor values.
Example: A webpage that turns a lamp ON/OFF from your smartphone.
2. Wi-Fi Controlled LED
Use the WiFi.h and WebServer.h libraries.
The ESP32 connects to Wi-Fi and allows LED control via a simple web interface or mobile app.
Great for learning GPIO basics and Wi-Fi setup.
Intermediate-Level Projects
3. ESP32 Weather Station with Sensors
Connect sensors like DHT22 (temperature & humidity), BMP280 (pressure), or LDR (light sensor).
Display real-time data on an OLED display or upload to cloud platforms like ThingSpeak or Blynk.
Teaches analog reading, I²C communication, and cloud data logging.
4. ESP32 Camera Projects (ESP32-CAM)
Use the ESP32-CAM module with OV2640 camera.
Create a live video streaming server accessible via IP address.
Add motion detection or cloud image storage.
Applications: DIY surveillance, pet monitoring, smart doorbell.
9.Advanced-Level Projects
5. ESP32-Based Smart Energy Meter
Measure voltage, current, power, and energy consumption using sensors like ACS712 or ZMPT101B.
Display readings on an LCD/OLED screen and upload data to cloud dashboards (Firebase, MQTT, ThingsBoard).
Useful for home automation and energy monitoring.
6. IoT Home Automation Hub
Use ESP32 as a central hub to control multiple devices.
Integrate with Google Home, Alexa, or Home Assistant.
Add multiple relays, sensors, and Wi-Fi/Bluetooth control.
7. ESP32 Robotics Project
Build a Wi-Fi or Bluetooth-controlled robot car.
Add sensors for obstacle avoidance or line-following.
Upgrade to autonomous navigation with AI libraries on ESP32-S3.
10. Troubleshooting & Common Issues
Working with the ESP32 is usually smooth, but like any microcontroller, you might encounter issues while setting up or programming. Below are the most common problems and their solutions:
1. Drivers Not Detected
Issue: ESP32 board is not showing up on your computer’s COM port.
Many ESP32 boards use CP2102 or CH340 USB-to-UART bridge chips.
Without drivers, the board won’t be recognized.
Solutions:
Install the correct USB drivers:
Try another USB cable (some charging-only cables don’t support data).
Restart Arduino IDE after installation.
2. Uploading Errors
Issue: Errors like “Failed to connect to ESP32: Timed out waiting for packet header”.
Solutions:
Press and hold the BOOT button while uploading, release when you see “Connecting…”.
Ensure the correct board (ESP32 Dev Module) and COM port are selected in Arduino IDE.
Lower upload speed to 115200 baud in Arduino IDE settings.
Check that the USB port is not loose or damaged.
3. Power Supply Issues
Issue: ESP32 resets randomly, unstable behavior, or Wi-Fi keeps disconnecting.
Causes:
ESP32 requires stable 3.3V power.
USB ports from laptops sometimes don’t provide enough current, especially when Wi-Fi/Bluetooth is active.
Solutions:
Use a good 5V/2A USB adapter or external power supply.
If using sensors and peripherals, add a 470µF or 1000µF capacitor across the ESP32 power rails.
Ensure voltage regulators can handle peak current (up to 500mA during Wi-Fi transmission).
4. Pin Conflicts
Issue: Some GPIO pins don’t behave as expected.
Common Mistakes:
Using GPIO0, GPIO2, GPIO15 incorrectly (these are bootstrapping pins).
Using GPIO6–11, which are connected to the onboard flash memory.
Forgetting that some pins are input-only (e.g., GPIO34–39).
Solutions:
Always check the ESP32 pinout diagram before wiring.
Use recommended pins for UART, I²C, SPI, PWM.
Avoid flash pins and boot pins for general I/O.
✅ Quick Tips for Stable Use
Keep your Arduino IDE and ESP32 board package updated.
Double-check jumper wire connections.
Use short, good-quality USB cables.
If the board gets too hot, check for short circuits in your wiring.
11. FAQs on ESP32
❓ 1. What is the difference between ESP8266 and ESP32?
ESP8266 was the earlier chip designed mainly for Wi-Fi projects with a single-core processor and limited GPIOs.
ESP32 is its successor, offering:
Dual-core 32-bit processor
Built-in Wi-Fi + Bluetooth (BLE)
More GPIO pins with multiple functions (ADC, DAC, PWM, I²C, SPI, UART)
Lower power modes and better performance
In short, ESP32 is more powerful, versatile, and suitable for advanced IoT applications.
❓ 2. Can ESP32 run on battery?
Yes ✅. ESP32 can be powered using Li-ion / Li-Po batteries (3.7V nominal, 4.2V max) with a regulator.
ESP32 has deep sleep modes, consuming as little as 10µA–150µA, making it efficient for battery-powered projects like sensors and wearables.
A good setup is using a TP4056 charging module + 18650 battery for portable applications.
❓ 3. How do I connect ESP32 to Wi-Fi?
Using Arduino IDE, you can connect ESP32 to Wi-Fi with just a few lines of code:
Replace ssid and password with your Wi-Fi credentials. Once connected, ESP32 can be used for web servers, MQTT, or cloud logging.
❓ 4. Is ESP32 good for industrial IoT?
Yes, but with considerations:
Advantages:
Dual-core power makes it capable of handling multiple tasks.
Wi-Fi + Bluetooth connectivity fits industrial gateways.
Secure features like TLS/SSL, hardware encryption, and secure boot.
Works well with MQTT, Modbus, and industrial cloud platforms.
Limitations:
It’s not ruggedized for harsh industrial environments (heat, vibration, EMI).
Needs additional protection circuits for reliable 24/7 use.
12. Conclusion
The ESP32 has established itself as one of the most versatile and powerful microcontrollers for modern electronics and IoT development. With its dual-core processor, built-in Wi-Fi and Bluetooth, rich set of GPIOs and peripherals, and power-efficient modes, it provides everything a maker, student, or professional engineer needs to bring an idea to life.
Whether you are building a simple Wi-Fi-controlled LED, a smart home automation system, or an industrial IoT gateway, the ESP32 is more than capable of handling the task. Its active community support, extensive libraries, and compatibility with both Arduino IDE and ESP-IDF make it approachable for beginners while still offering advanced tools for professionals.
If you’re just starting, try a basic project like the Blink LED or a Wi-Fi web server. From there, you can expand into data logging, cloud integration, robotics, or wearable devices.
In short, the ESP32 is the best choice for modern IoT projects because it balances performance, cost, and flexibility, making it the go-to development board for hobbyists and professionals alike.